Pages

Wednesday, November 28, 2012

Calendar Cards: Christmas

I'm a bit of a Christmas nut (hehe) - I REALLY love Christmastime and look for any excuse to get crafty during this wonderful time of year.  That said, I truly enjoyed making these calendar cards for all of you.  I know I've been taking a looong (and much needed) break, but it doesn't mean I'm not thinking about all of you!

Happy Christmas!
 Click here to download

Please keep in mind that I format these myself, so they're not perfect, but they'll certainly get the job done. : ) Also, as with all of my printables, these are for your personal use only - please do not sell or offer them in a giveaway. Thank you and enjoy!

~Thank you for your comments!~

Sunday, November 4, 2012

Calendar Cards: Thanksgiving


Later this month we'll be celebrating the American holiday, Thanksgiving, so I made these calendar cards with that in mind.  As requested, I'm making these available to all of you. :)

Click here to download

Please keep in mind that I format these myself, so they're not perfect, but they'll certainly get the job done. : ) Also, as with all of my printables, these are for your personal use only - please do not sell or offer them in a giveaway. Thank you and enjoy!

~Thank you for your comments!~

Saturday, September 29, 2012

Calendar Cards: Halloween

I can't believe October is upon us!  I made these new Halloween themed calendar cards for our classroom calendar.  Thought maybe your little spooky cuties would enjoy them, too!

Click here to download

Please keep in mind that I format these myself, so they're not perfect, but they'll certainly get the job done. : ) Also, as with all of my printables, these are for your personal use only - please do not sell or offer them in a giveaway. Thank you and enjoy!
~Thank you for your comments!~

Saturday, September 1, 2012

Getting Ready for Mickey! - Part 4

I've been having so much fun making things in preparation for our trip to Disney World this fall. I'm reeaaallllyy excited about this trip and even though I know it'll be an amazing time without my help, I'm doing what I can to add a little extra magic here and there!

 
~Final Countdown~
You can read more about this here.

 
~Pacifier Clip~
I wanted to make Juliet some little crocheted flower hair clips, so one day I decided to learn how to crochet. (It's easy peasy, btw!) Then, a funny thing happened: As I crocheted little circles for the flowers, I began to see a hidden Mickey emerge in my hands!  Next thing I knew this little Mickey head pacifier clip was born!  I purchased the actual clips on Etsy and hot glued them onto the back of the mouse head.  Juliet only likes the Soothie brand pacifiers, and this clip is just perfect for them as they simply loop around one of the holes on the pacifier.  I may or may not have gone a little crazy and made several in different colors. :)

 
~Disney Family Nights~
We've been having a DFN just about every other weekend now that our trip is drawing near.  Since my last GRFM post we've enjoyed a Snow White night, a 101 Dalmatians night, and a Toy Story night.  I have yet to post about our Finding Nemo night, our Beauty and the Beast night, and our Mulan night, but be sure to check back in September to find out more about them!

 
~Mickey Mouse Mini Unit~
It was time to bust out our Mickey Mouse mini unit once again.  James hasn't used this in months, so it was a treat for him to work with it again.  Lots of fun stuff in here.  We also filled out this grammar activity.  It's a lot like mad-libs. James LOVED this!

 
~Learning About US Presidents~
We are patriotic bunch here, so naturally we have lots of USA learning materials around the house.  Knowing that we want to visit the x in Disney World, we've been looking through our US Presidents Fandex just to familiarize ourselves with some of the prominent faces we'll be seeing in the attraction.  (Yes, I'm one of *those* homeschooling parents - you know, the ones who can't go anywhere without trying to slip in a little school). :)
~Calendar Cards~
Available for download in this post.

 
~Pillowcase~
This wonderfully cozy flannel pillowcase will decorate James' pillow nicely while we're in WDW.  We're staying at the Beach Club Villas and since they have a more subdued look to their rooms, we thought this case would jazz things up a bit!  And psst... one of you will get to win this (and other fun prizes!) in my upcoming Grand Giveaway!!

~Special Event Invitations~
There are a couple of surprise events (character meals, parties, parks) we have planned for James while we're in Orlando and so I decided to create special invites that will magically appear under our door the morning of said event. For most of the Disney related events I used the pages found here (heads up, you'll have to dig for them!).

~Tinkerbell Swim Coverup~
I just *love* this little cover up!  It has small wings on the back, too.  So cute and comfy!  I purchased it from this Etsy shop (note: the shop is closed and there's a looong wait list).

We've also...
:: Talked about height restrictions for rides (so there's no disappointment at the time), and what to do if one of us becomes unintentionally separated from our group.
:: Booked a babysitter (so the Hubs and I can enjoy a little kid-free date night at Le Cellier!)
:: Looked through friend's WDW trip photos.
:: Watched character meet-greet videos on YouTube (James hasn't been a fan of large, costumed characters in the past, so I wanted to give him an idea of what to expect.)
:: Read LOTS of Disney books, watched movies, and listened to our Disney playlist (about a thousand times).
:: Made a list of addresses for people we'll be sending postcards to.
:: Ordered groceries for our villa.
:: Added all of our confirmations to our Tripit! app.

My current fav. Disney planning sites:
Party Crafting & So Much More has an awesome post on Cheap & Free Disney World Souvenirs.
Disney Done Right has some great tips on Packing for the Parks.

You can also view my favorite ideas on my Disney World Vacations pin board.

And so we've *finally* reached the point when our Disney World trip is just around the corner (eee!!!).  It's been a looong time coming!  Alas, this will be my last "Getting Ready for Mickey" post. (Either you're VERY happy about this, or you're like me - a little sad.) :(  But, if you're new to my blog or feeling nostalgic for Disney posts, click here to see other parts to this series. :)

~Thank you for your comments!~

Friday, August 31, 2012

Treasure Basket: Puzzles

 
Here's what's inside:
:: Chunky puzzle pieces from our Melissa & Doug Sea Life puzzle.

This is the *easiest* basket to put together!  And, not surprisingly, Juliet loves them - the colors, the shapes, and since they're made of wood and non-toxic paint, I have no qualms about her putting them in her mouth.  I often mix and match the pieces since we have several of the M&D Chunky puzzles.

While none of these things are choking hazards, I always observe Juliet while she explores these baskets.

Click here to read my very first treasure basket post for details on the how and why behind treasure baskets. Click here to view my treasure basket slideshow on the Counting Coconuts Facebook page.

~Thank you for your comments!~

Thursday, August 30, 2012

Calendar Cards: Disney

I made some new calendar cards in honor of our upcoming trip to Disney World.  They do include Disney images, but since I'm not selling these, I *think* I'm allowed to share them with all of you. :)
Click here to download

Please keep in mind that I format these myself, so they're not perfect, but they'll certainly get the job done. : ) Also, as with all of my printables, these are for your personal use only - please do not sell or offer them in a giveaway. Thank you and enjoy!


~Thank you for your comments!~

Tuesday, August 28, 2012

Disney Family Night: Snow White

One of the (many) things we're doing in preparation for our big trip to Disney World is to have a Disney Family Night about once a month until we leave . In short, we pick one of our favorite Disney movies and then create a themed night around it. It's a fun way to bridge the long wait!

One our recent movie nights featured Snow White and the Seven Dwarves...

 
Did you know Snow White takes place in Germany?  Or at least that's the country associated with this movie.  Strange, though, because I really see no German connections in the movie, do you?  Anyway, I went with it and followed a German theme. :)

Activities
:: We mined for gems.  I used one of our empty sensory tubs, filled it with plain rice and buried lots of acrylic gems within it.  James used various "tools" (small fish net, slotted spoon, spatula, tongs, etc.) to excavate the gems.
:: We cast coins into our wishing well. I added some small pebbles and water to a medium sized metal bowl, and gathered some coins in a small basket. I created a sign that said "I'm wishing... Throw coins into the well and make a wish".  James LOVED this activity and threw all 40 coins into the well (one by one) and made a wish each and every time.  So cute.  The metal bowl makes a satisfying "ting" kind of sound whenever a coin hits it. :)
:: We looked at the German items from our Europe Continent Bag.
:: We played "Guess the Dwarf" by acting out the various characteristics of each dwarf.
:: We listened to songs from the movie while prepping dinner.
:: We watched the movie (of course!).

Food
 
Keeping with the German theme, here's what was on our menu:
Appetizer: Gold Mining Sticks (mini pretzels sticks with melted cheese {aka gold} for dipping)
Dinner: Forest Berries (mixed berries), Sneezy's Sausage (grilled bratwurst), Grumpy's Potatoes (German potato salad)
Desert: Snow White's Sweet Apples (sliced apples with a bit of drizzled caramel)
Beverage: Witch's Brew (root beer) - for this I removed the label and since it's a dark beverage it really does look a bit sinister. : )  James was actually a bit nervous until he tasted it!

Decor
I decorated our place settings with the typical red, yellow, blue color scheme of Snow White.  I also  bought a big bunch of apples and arranged them in an apple picking basket, I gathered some of our woodland forest animals, and I set a large mirror near the table (think: "mirror mirror on the wall..."). 
~Our little Snow White~

Overall a very easy and enjoyable evening!  We also had a Finding Nemo night, which was a blast - I hope to post about that soon! Click here to see our other Disney nights - more to come!

~Thank you for your comments!~

Friday, August 17, 2012

Practical Life - Applying Sunscreen

The idea for this work came from one of my Facebook readers (thank you, Mary!) and I thought it was absolutely brilliant given our current season. Here in Bermuda the sun beats down on you and I make a point to cover my kiddos in sunscreen whenever we're out and about. James is well old enough to learn to apply sunscreen himself and, knowing Mr. Independent, he'll love having free reign of that bottle!

To do this work, James will first use one of the wipes in the large container to clean his face. He'll then squeeze a small amount of sunscreen from the bottle onto the small dish. Holding the mirror (the silver thing in the photo), he'll use his finger to dab a tiny bit of sunscreen on his face, applying a little at a time until he has complete coverage. He'll then use another wipe to clean his hands (and face since this is a schooltime activity).

~Thank you for your comments!~

Wednesday, August 15, 2012

Treasure Basket: Sounds

A basket filled with things that make gentle sounds.

Here's what's inside:
:: Glass jar filled with various beans
:: One of the sound cylinders from our set
:: Maraca (from my trip to Mexico)
:: Crocheted bells
:: Cherry teether
:: Baby "rainstick"

While none of these things are choking hazards, I always observe Juliet while she explores these baskets.

Click here to read my very first treasure basket post for details on the how and why behind treasure baskets. Click here to view my treasure basket slideshow on the Counting Coconuts Facebook page.

~Thank you for your comments!~

Monday, August 13, 2012

Final Disney Countdown!

Our trip to Disney World is just around the corner and as such we are in serious countdown mode! We're still using this countdown I made, but I decided to create something fun for our final countdown...

I made 35 little envelopes and put a note inside each one. (The envelopes were made with basic cardstock folded in half and stapled on either side. I added a little Disney-themed washi tape to the outside and numbered each one.) Each day, James will find the envelope that coordinates with the number on our other countdown and remove the note inside of it.

The notes indicate various activities- here are a few examples:
:: Dance around to "I Wanna Be Like You" from the Jungle Book
:: Only 3 more weeks until we leave for Disney World! Have fun looking through our Mickey Mouse mini unit!
:: The Tramp takes Lady to dinner one night... what do they eat? Have that for dinner tonight!
:: Is the shoe a perfect fit? Pretend you're Cinderella and try on Mom and Dad's shoes!
:: It's your un-birthday today! Enjoy a cup of tea just like Alice!
:: Merida is from Scotland - find her country on a map and then read the story on our iPad!
:: Today's the day!! We're off to Disney World! Put on your new Mickey Mouse shirt and LET'S GO!!

There are sooo many ways to create a Disney countdown. Pinterest is full of inspiring ideas! One way that I was really considering is the simple paper chain. It brings back all sorts of good memories from my primary school days, but in the end I decided against it. The chain is something we already do during the Christmas season, and I want to keep that separate and special.

What kind of countdown do all of you Disney goers create?

~Thank you for your comments!~

Saturday, August 11, 2012

Treasure Basket: Soft

A sweet little treasure basket filled things oh so soft. :)

Here's what's inside:
:: A large and beautiful rainbow silk
:: Fabric number
:: Counting cookie
:: Knitted bunny
:: Fluffy "pillow"
:: Velour fabric square
:: Wee dolly

While none of these things are choking hazards, I always observe Juliet while she explores these baskets.

Click here to read my very first treasure basket post for details on the how and why behind treasure baskets. Click here to view my treasure basket slideshow on the Counting Coconuts Facebook page.

~Thank you for your comments!~

Thursday, August 9, 2012

Practical Life - Folding Clothes

In order to keep up with all of the laundry in our home I do a wash about once a day. Doing this makes life and facing the laundry basket so much easier come the end of the week! James already puts away his own clothes, but I still fold them. Until now, that is! I know James isn't really going to dig this new life skill, but it's a very important skill to learn and one I'm excited to teach him. I (and his future wife) will appreciate his help in this area! :D

Included in the basket are three child size, cotton, logo-free t-shirts (appliques can bunch and make folding a bit more tricky for those just learning), and a pair of plain white socks. After my initial instruction, James will roll out his work mat, select one item from the basket - let's say a t-shirt - and lay it out flat on the mat. He'll then fold it over length wise just once, fold the sleeves in, and finally fold the bottom of the shirt up so it meets the neckline.

~Thank you for your comments!~

Tuesday, August 7, 2012

Disney Family Night: 101 Dalmatians

One of the (many) things we're doing in preparation for our big trip to Disney World is to have a Disney Family Night about once a month until we leave . In short, we pick one of our favorite Disney movies and then create a themed night around it. It's a fun way to bridge the long wait!

James' (current) favorite Disney movie is 101 Dalmatians. He's really into puppies right now, and was ecstatic that we were going to spend a whole night focusing on puppies!

When I plan these nights I have four main "departments" in mind - food, decor, music, and activities. So, for decor, I try to lightly transform our kitchen/family room into that theme. I don't go ALL out, but just enough to give James a sense of being a part of the movie we're celebrating. He gets *SO* excited and filled with anticipation when he knows I'm decorating the kitchen, and I often catch him peeking through one of the windows to catch a preview! :)

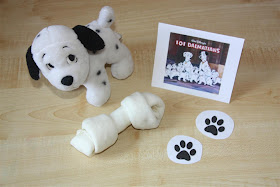
For our 101 Dalmatians night, I printed off lots of little paw prints, cut them out, and taped them all over our kitchen & living room! I also arranged several of James' stuffed puppies in various places - hanging out of cabinets, sitting atop the counter - so it'd look like they were climbing all over everything. :)

I made some "puppy ears" for James. They seriously took me two minutes to make. I used one of my headbands, cut out two dalmatian ear-shaped pieces out of black felt and paper-clipped them to the headband. Easy peasy!

While dinner was cooking, we played a few games. One was "Find the Bone" - I bought (and later donated to our neighbor's dog) a real dog bone and hid it somewhere in the house. James put on his puppy ears to "listen for clues" on where to find it. I also printed off some activity sheets from here, and made a puzzle out of an image I found on Google Images. In an effort to add an educational twist to the night (I'm a teacher, what can I say?!), I created and printed out a little blurb about why dalmatians are fire dogs.

For dinner I tried to keep the movie's locale in mind - England. Here's what was on our menu:
:: Rolly's Chew Sticks (aka large pretzel rods)
:: Perdita's Pie (aka shepard's pie) - this is actually a long time favorite in our house. I know we don't make it quite the way the Brits do, though, and I'm sure it's very Americanized. It's super yummy - crumbled hamburger, gravy, and peas, topped with a thick layer of mashed potatoes and sprinkled with a bit of cheddar cheese.
:: Pongo's Punch (aka milk with tiny chocolate chips) - in the movie, the puppies are directed to a farm where they receive fresh milk. I was glad to be able to offer James milk with his meal and still keep in theme with the movie! :)
:: Lucky's Biscuits (aka bone shaped sugar cookies) - these were our dessert and were yum-may!
:: Patch's Pupcorn (aka popcorn) - we used the kind that has salt and pepper seasoning because it gave the popcorn a subtle dotted look. :) We enjoyed this halfway through the movie.

Click here to see our other Disney nights - more to come! Next up is Finding Nemo!

~Thank you for your comments!~

Sunday, August 5, 2012

August Sensory Tub - The Wizard of Oz

Several of you suggested I make a Wizard of Oz sensory tub, and since that happens to be one of my favorite movies, I was totally up for it!

I only used things I had on hand already (meaning I didn't spend any money on making this tub) and so I had to be a bit creative as a result (meaning some of things in this tub are a bit of a stretch). :)

Here's what's inside:
:: The Yellow Brick Road - yellow Lego bricks. Perfect for my Lego lovin' boy!
:: Poppies - red fabric flowers. Yes, I know these aren't what actual poppies look like. :)
:: Lion(s), Tiger(s), and Bear(s) - one each from our Toob collection.
:: Apples - I made these little knitted apples myself. They, along with the tree in the lower right hand corner, remind me of the scene where Dorothy and the Scarecrow get into a row with the apple trees.
:: OZ - two chipboard letters.
:: Emeralds from Emerald City - a few plastic "gems".
:: Over the Rainbow - colored wooden beads on a string. Surprisingly, James likes this the best! Initially, I thought about making this a lacing activity, but I knew James wouldn't really enjoy that. I spaced the beads out enough that they move a bit on the string, which makes the whole thing really nice to hold. Sort of meditative.

Things to represent Dorothy:
:: Basket - just a cute little basket I found at the thrift store.
:: Toto - a black dog. I didn't have a Terrier on hand, but this Labrador works just fine. :)
:: Farm house - a small wooden house.
:: Heart - I was excited to find this little heart in Dorothy's gingham pattern! It represents the whole "home is where the heart is" theme of the movie.
:: Ruby slippers - I couldn't believe it when I found these Barbie shoes in our toy collection. Years ago, before I had children, I was a nanny and a frequent babysitter. I bought and kept a stash of toys at my house for whenever those kiddos came over. :)
:: Hair bow - I would like to have made two gingham hair bows (one for each of Dorothy's braids) but I didn't have that sort of ribbon on hand. So, glittery red (like the ruby slippers) was the next best thing!
:: Kansas - a puzzle piece from our USA puzzle.

Things to represent the Tinman:
:: The oil can - just a tin cup with a handle. Perfect for scooping, collecting, and pouring all the little things in the tub.
:: Axe - this is from our "x" language box.
:: Heart - one of the small glass hearts used during our Valentine's Day theme.

Things to represent the Scarecrow:
:: Scarecrow - the same small scarecrow button we used in our harvest sensory tub.
:: Hay (Scarecrow's stuffing) - pieces of raffia.
:: Diploma from the Wizard - a tiny piece of paper that has THD written on it, rolled up, and tied with a teeny tiny piece of ribbon. I was racking my brain (ha!) trying to think of what I could use to represent Scarecrow's brain. I remembered the Wizard gave Scarecrow a diploma and in that scene he bestowed the degree of THD (Doctorate of Thinkology) upon him. :)

Things to represent the Lion:
:: Lion - from the lions, tigers, and bears trio as noted above
:: Medal of Courage - like I said, I had to use what I had on hand, and this one really threw me for a challenge! I used a piece of red ribbon and a little lapel pin James received from VSB camp.

Things to represent the witches:
:: Glenda's floating orb - you know, the one she floats down in when she arrives in Munchkin Land. I used a pink reusable ice cube ball thingy.
:: Star from Glenda's wand - a little silver star made of fabric.
:: Wicked Witch's Broom - another item from one of our language boxes.
:: Flying monkey - just a little monkey from our Toob collection. I thought about adding tiny wings to him, but decided against it.

James is 5 now, but he still very much enjoys sensory tubs. However, now that he is a bit older, I've been including some theme-related educational materials to accompany our tubs. For example, for this tub I gathered the Kansas magazine and map from our Which Way USA collection. I also added the Wizard of Oz book, which we've been reading nightly, and "Pet Tornado" - this thing is really cool, you swirl it around and it creates a little tornado inside the container. James loves it!

~Thank you for your comments!~

Friday, August 3, 2012

PlanetBox Giveaway WINNER!

Thanks to all who entered the PlanetBox giveaway!! While it took me a long time to go through all 982 comments(!), I thoroughly enjoyed reading each and every one of them. :)

The winner of the Complete Rover PlanetBox set is...

Sabrina Johnson!

Congratulations, Sabrina! Please contact me (countingcoconuts1@gmail.com) within 48 hours to claim your prize. If I do not hear from you by then, I will need to select a new winner. Thanks!

Monday, July 30, 2012

Sensory Tub - The Human Body

The idea for this tub comes from one of my lovely readers, Mary, who reached out all the way from Thailand! (LOVE how connected we all are!) Mary asked me for some ideas for a human body sensory tub and I thought - why not make one for James? Next to geography and space, James is fascinated with human anatomy. Thank you, Mary for inspiring me!

Now, I know this isn't the prettiest looking thing, but it is all about human insides, so... :)

Here's what's inside: (bear with me, I had to creative on this one! Biology teachers will cringe, I'm sure!)
:: Kidneys - Kidney beans :D
:: Eyes - googly eyes
:: Small intestines - pink yarn (12 feet of it which is, according to Google, the length of a child's small intestine.
:: Heart - wooden heart
:: Veins - red and blue pipe cleaners
:: Blood cells - red and white flat marbles
:: Bladder - balloon loosely filled with water (HUGE hit with James!)
:: Teeth - wind up toy shaped like teeth
:: Hands - buttons shaped like hands
:: Skeleton - plastic skeleton (and book - see below - both from our Halloween mini unit)
:: Chromosomes - LOTS of x's and y's from my scrapbooking embellishments. I included 15 matching sets, each set has only one x and one y. Next to the bladder, these were James' favorites. He really enjoyed searching through all the kidneys for the "croomzooms". :)

A couple things also included, but not pictured (because I added them later and was too lazy to reshoot):
:: Stomach - balloon filled with beads
:: Surgical tools - tweezers, tongs, and a small bowl

In addition to the sensory tub, we've been looking through our favorite anatomy books (this one and this one), and I decided to pull out this felt pack, too. James also received this awesome "squishy human body" for Christmas and so we've been having fun with that as well.

Click the button below to see a full list of my sensory tubs or click here to view my slideshow on the Counting Coconuts Facebook page.


~Thank you for your comments!~

Sunday, July 29, 2012

Treasure Basket: Instruments

Here's what's inside:
:: Rhythm sticks
:: Maraca
:: Clacker
:: Castanet
:: Jingle bells
:: Mini rain stick

LOTS of textures and sounds in this one! I think this was Juliet's favorite so far!

While none of these things are choking hazards, I always observe Juliet while she explores these baskets.

Click here to read my very first treasure basket post for details on the how and why behind treasure baskets. Click here to view my treasure basket slideshow on the Counting Coconuts Facebook page.
~Thank you for your comments!~

Saturday, July 28, 2012

Disney Family Night: Toy Story

One of the (many) things we're doing in preparation for our big trip to Disney World is to have a Disney Family Night about once a month until we leave . In short, we pick one of our favorite Disney movies and then create a themed night around it. It's a fun way to bridge the long wait!

Last weekend we celebrated Toy Story!
Toy Story is one of my favorite Disney-Pixar movies, and it's a classic in my book. I remember being amazed by how fluid and life like the images were. And I'm a huge Tom Hanks fan, too. Anyway... we had such a fun night with this theme. Here's what we did:

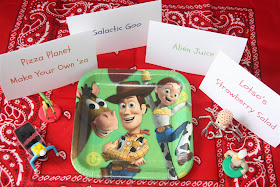
To set the tone, I printed out some posters from here and here, and I arrange various books and toys around the room. We happen to have a Mr. Potato Head, some green army men, an Etch-A-Sketch, and a Barrel of Monkeys on hand. We also had the soundtrack to Toy Story (the 1st) playing in the background.

We prepared dinner together - here's what was on our menu:
:: Make Your Own Planet Pizza - I bought mini Biboli crusts and set out a variety of toppings for us to make our own pizzas. James loved this and said, "Finally, I can make my pizza the way I like it!" which meant adding about 100 pepperonis to his pie. (Mommy vetoed 95 of them.)
:: Lotso's Strawberry Salad - this one is a family favorite. Baby arugula, blue cheese, candied pecans, and strawberries, topped with balsamic vinegar dressing. Y-U-M.
:: Galatic Goo - this was our dessert. It was purple grape jello with star sprinkles on top. Ridiculously easy to make and a HUGE hit with James!
:: Alien Juice - this was our beverage. Crystal Lite lemonade made with sparkling water and a few drops of green food coloring (to give it that alien color). :)

While the pizzas were baking, we played a few games. James received a Toy Story memory game as a birthday present, so we played a short round of that as well as a few turns of "Find the Moon Rocks". For that game I placed a chocolate Hershey's Kiss inside a small piece of tin foil and then gently crumpled it up to resemble a moon rock. I hid these around the house and James went in search of them. :) I also created an activity with the Etch-A-Sketch where we all took turns trying to make certain shapes. James and his dad also made chains out of the monkeys from our Barrel of Monkeys.

I also put together this little guessing game - "Guess How Many Army Men Are In the Jar?" James took one look and - no joke - guessed the correct number within 1. Even my sweet Hubs was off by 5!

Our favorite game was "The Claw Game". I assembled a mystery bag full of Mr. Potato Head parts and created a checklist to go along with it. James had to reach his "claw" inside the bag and without looking, guess which piece he was holding. He checked off the pieces as he went along and afterwards created a finished Mr. Potato Head. Let me know if you're interested in the printable I made for this game - I'm happy to share it!

We didn't use these resources, but I ran across them while planning this night. I thought maybe some of you might like to use them: Toy Story Pre-K Pack & Toy Store Fun Book. And of course there are TONS of ideas on Pinterest and DisBoards.

At the end of each Disney night, James randomly selects the next theme from a basket. Coming up:

101 Dalmatians!! (Awesome movie tickets from here!)

Click here to see our other Disney nights - more to come!

~Thank you for your comments!~

Friday, July 27, 2012

PlanetBox Review & Giveaway!!

~This giveaway is CLOSED~

I'm positive most of you have heard of PlanetBox, but for those who haven't, get ready to learn about a truly awesome resource that's great for EVERYONE!

To quote PlanetBox's website, PlanetBox is:
"lunch transportation for a green generation".
I just love that!

I would have been tickled pink to have a lunch box like this when I was a kid. I had a blue plastic Smurf lunch box (which I still have, btw!). I remember when I'd open it at lunchtime I'd find the little plastic baggies of food were all jumbled together and smooshed after having been pummeled by my matching :) thermos. Oh and I remember the latch on that box, too - that flimsy thing would pop open and my sad little lunch would end up all over the sidewalk. Really, no joke - that happened to me! It's funny to think about now, but even at 7 years old that drove me crazy!

Well, I'm delighted to say that PlanetBox has come up with a fantastic solution to those old lunch box problems. They designed lunch trays with compartments! More than that, the compartments are specifically measured with portion control in mind. And the latch on the box is excellent in that not only does it stay closed when needed, it's easy for little hands to manipulate. No tricky closures here!

Want to know what is really cool about these boxes? They are made of stainless steel which means they are non-toxic, they won't stain, and they don't retain the odors from lunches past! Also, they are completely reusable! Totally eco-friendly AND they're dishwasher safe. Talk about economical and efficient!

Want to know what James would say is the coolest thing about these boxes? The magnets! The founders and creators of PlanetBox (a husband & wife team who are parents themselves) didn't overlook the fact that they were making lunch boxes for kids. They came up with the brilliant idea of making magnet sets to adhere to the outside of the box. They are removable and you can mix and match the many sets!

We've had our PlanetBox for about a year now and we just l-o-v-e it. We've used it quite often over the past 12 months and I'm pleased to say it's still as good as new!

Here's a photo of James and his Planetbox. (This day's meal included: carrot sticks, pitted cherries, blueberries, popcorn, star shaped peanut butter sandwich on whole wheat, and a few gluten free cookie buttons.) James and I have such fun coming up with new ideas for filling up those compartments and new ways to display his food. He enjoys his meals so much and I know he's getting everything he needs and in just the amount he needs.

(Feeling not so creative when it comes to food combos? There are TONS of meal ideas on PlanetBox's Facebook page and an excellent grocery list printable on their store website.)

And with this handy carrying bag, it's super easy for James to tote his lunch to camp. The handle is just his size and the whole system is sleek - not at all bulky. On the outside of the bag there's a place for his water bottle, and a pocket for a mid-morning snack. On the inside is an interior slot for a PlanetBox cold kit, and even a couple little straps that secure utensils or a sweet little love note. :)

We have the complete Rover set, so we also have these awesome little "dippers". We use these containers all.the.time. They are excellent for holding wet and dry foods. And they don't have to be used with your lunch box, either. In fact, both of our dippers are in my diaper bag right now holding cheerios and goldfish crackers! :)

Ok, so now you understand why I'm such a huge fan of PlanetBox. Would you like one of your own? You can hop on over to the PlanetBox shop and buy one now. True, they initial price may seem a tiny bit high, but consider the fact that these are reusable - meaning they'll last you a lot longer than a brown paper bag and plastic baggies! Care for them properly and you'll enjoy your lunch box for YEARS! It ends up being a savings for sure.

You can also enter to WIN a PlanetBox! Yep, that's right, the lovely folks at PlanetBox are very generously gifting a Rover set to one of my readers! And we're talking the COMPLETE set here! (A $60 value!)

One very lucky person will receive:
:: 1 Rover lunch box
:: 1 Magnet set (the design is the winner's choice)
:: 1 Dipper set
:: 1 Carry bag (the color is the winner's choice)

Are you excited?! I am!! I'm thrilled that one of you will get to enjoy the fun and goodness that is PlanetBox! :D

Here's what you need to do to enter to win:
Mandatory entry:
1. Leave a comment on this post.

Extra entries (i.e. more chances to win!!):
2. Like PlanetBox on Facebook and leave me a separate comment on this post letting me know you have/already do.
3. Follow PlanetBox on Pinterest and leave me a separate comment on this post letting me know you have/already do.
4. Like Counting Coconuts on Facebook and leave me a separate comment on this post letting me know you have/already do.
5. Follow Counting Coconuts on Pinterest and leave me a separate comment on this post letting me know you have/already do.
6. Subscribe to Counting Coconuts (in whatever way suits you) and leave me a separate comment on this post letting me know you have/already do.
7. After today come back and leave me one comment per day on this post until the end of the giveaway.

*Reminder re: separate comments - each entry will be counted as a chance to win. If you put all of your entry requirements into just ONE comment, you'll only have ONE chance to win.

This giveaway will end on Thursday, August 2nd at 9pm Atlantic Time, and is open only to those with a US address.

Good luck!

~All photos courtesy of Planetbox.com~

Thursday, July 26, 2012

Practical Life

It's been a long time since I put together new practical life work for James. I guess that's because we've moved out of our classroom (it's now Juliet's Montessori bedroom) and school happens at the kitchen table where it's just not conducive to have loads of trays spread about.

But, truth be told, I miss creating these works so this past weekend I assembled four of them and I figure we'll just bring one out at a time. Here's what I made:

Polishing Sunglasses. I thought this was timely given the sunny season that's upon us here in Bermuda. To do this work, James will remove everything on the tray and arrange it neatly on his work table. He'll remove the glasses from the case, use the little brush (in the cup) to dust the lens. Then he'll open the water container (it's colored so he can easily see that the cotton swab he'll be using is wet - it'll absorb the blue color), dip the swab in and then gently coat the lenses. After that he'll use the cotton ball to remove the wetness and the polishing cloth to shine the lenses and the frame. The used materials will go into the waste bin and the work materials will be returned - neatly - to the tray.

Transferring Feathers. I think the photo is pretty self-explanatory. James will use the clothespin to transfer the feathers from one basket to the other and then back again. It's tricky and requires some focus and patience because the clothespin is tighter than a tweezers (though still completely manageable - I always test the work after I put it together) and the feathers are very fluffy and not very easy to "pinch". I know James will like this one. Oh and PS: a little Bermuda shout-out since I'm using the Somerset Cricket team's colors!

Changing Batteries in a Flashlight. We're in the midst of hurricane season here and one thing I guarantee you every house on this island has is AT LEAST one flashlight! We have several throughout the house and this one is James', which is kept in his room. To do this work James will unscrew the cap of the flashlight, remove the current set of batteries within, and discard them safely. He'll then open the little wooden chest (I always like to provide fun little container - it adds to the element of interest in the work) and remove the new set of batteries. To finish, he'll insert them into the flashlight, screw the cap back on and switch on the light to be sure he completed the work correctly. If not, he'll repeat the steps. Positive this one will be a huge hit and ALL of flashlights will be in for a battery makeover. :)

Open & Close Containers. I bought these little paint containers a couple of years ago. I knew they had some school potetnail (outside of holding paint), but I wasn't sure what. Lo and behold the day has come for these gems. They're pretty small, so again it'll take some patience to open them just right so the contents don't fly out! Inside of each container I put a single alphabet bead. To do this work, James will open a container, remove the bead and place it in the little wooden bucket :), then "discard" the now empty container into the other bowl. He'll repeat this until every container is emptied. Then he'll set out all of the letter beads onto his work table and proceed to identify as many words as he can spell. He'll record them in the little homemade notebook. James has really been into spelling lately, so I think he'll like this one, too.

After making these I was thinking it would be fun to do these more often. Maybe a few every week or two? Would you all like to see more of these practical life works?

To see more practical life work, check out the "On Our Shelves" set on my Flickr photostream.

~Thank you for your comments!~