Tuesday, March 30, 2010

Wax Painting Easter Eggs

This is a very special egg decorating method that's dear to my heart - I'll call "wax painting". Painting eggs with melted crayon wax is a tradition that's been in my family for generations. My mother taught my sister and me how to do it and it was a family tradition until she passed away in 1988. Up until yesterday it had been 22 years since I decorated eggs this way. It was bittersweet to revisit this old tradition and it took me right back in our tiny kitchen in Minnesota. I was happy share our little family secret with my niece and now I'll share it with all of you, too...

Update: My Aunt recently posted a video tutorial on YouTube - click here to view it.

Here's what you'll need:

::LOTS of crayons
::A muffin tin (we used a 12 cup tin)
::A roasting pan (or any shallow pan that's larger than the muffin tin)
::Pencils (enough for each person)
::Flat head pins (enough for each pencil)
::Clean, cool, and dry hard boiled eggs
::Water

Begin by peeling all the crayons

Then group them into color families

Stick the pin into the eraser on the pencil. This will be your "paintbrush".

Pour hot water into the roasting pan and place the crayon-filled muffin tin inside of it.

Place the pan over a burner on your stove top and heat on medium-low. Once the crayons are good and melted, you can turn the burner down to just a simmer.

::Now, this next part is a bit tricky, so if you find it doesn't work for you straight away, don't give up - it takes some of practice!::

Using your "paintbrush", dip the head of the pin into the melted color of your choice and very quickly drag the pin across the egg, tipping the pin to the side while you do this. The key is to move quickly because it takes seconds for the wax to harden onto the pin instead of onto the egg. The beauty is, if you make a mistake you can easily scrape off the wax and try again. {Tip: to remove the excess wax that will eventually accumulate on your pin, simply dip the pin into the hot water on the outside of the muffin tin.}

This starburst pattern was a favorite of my mother's, but you can experiment with any kind of design you can think of.

You can also dip the entire egg into the wax. (Be careful though -the wax is hot!)


After you've finished decorating your eggs, let the wax harden a bit and then place the entire tin in the freezer. About an hour later you'll have some new crayons! I plan on putting these in James' Easter basket. :)

I should mention that at our little egg decorating party, we used a variety of methods, too - wax and sticker resistance, dye, sponge painting, glitter, and markers.

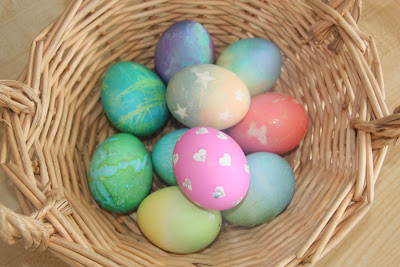
What a pretty basket of goodies!

James really got into this - I think he'll have green hands for the rest of the week!

Monday, March 29, 2010

Easter Sensory Tub & Playdough

I'm getting this out just in the nick of time!

Our niece, Tia, is here visiting and she and I had so much fun making our Easter sensory goodies.


PlaydoughWe made a big batch and then separated it into thirds to create a few colors for James to mix and match. There's blue with glitter, purple with glitter and a cinnamon scent, and lime green with a citrus scent. And of course there are lots of Easter themed cookie cutters.


Sensory Tub
Tia thought of some very clever and creative ways to incorporate the religious aspect of Easter into our tub.

::Pink and green rice
::A wooden egg cup filled with stones (to symbolize the boulder in front of Jesus' tomb)
::Bits and strips of palm leaves (in honor of Palm Sunday)
::Confetti doves and crosses
::A wooden spoon
::A little shovel
::Some puffs
::A knitted egg
::Some pretty red beads
::Plastic egg filled with more puffs

Tia also thought of putting a piece of linen in there for Jesus' shroud, some branches (instead of thorns) for his crown and some blunt end screws (instead of nails) to symbolize Jesus being nailed to the cross. We didn't have any linen and I vetoed the screws, but the branches were a great idea - I just forgot to add them.

Thursday, March 25, 2010

Easter Activities

Lots of fun things to keep us busy for the next couple of weeks... (as always, click on pictures for a close-up)

Practical Life:
Pouring egg shaped gems. Notice the cute little Peter Rabbit cups? They're so tiny! I bought one years ago (I love Peter Rabbit) and imagine my delight when I saw a second one - a perfect match - at the thrift store a few months ago!

Tonging puffs. Well, these aren't really puffs now that I think about it. They're like spiky little balls. Anyway, the goofy tongs are the kind you use while you're decorating eggs. James will get a kick out of them.

Spooning spring colored "pebbles". When living on an island with limited supplies, you must think outside the box. I'm always keeping my eyes open for possibilities in unlikely places. These pebbles are actually meant to be used for decorative purposes. For filling a vase or something like that. I found them in the home decor section of Brown & Co.

Open and close. These are a constant on our shelves. James' favorite for sure. I just make sure to switch up the items every couple of weeks. There's a small egg eraser inside each thing.

Sensorial:Sound eggs. I made these over a year ago and they are just now making an appearance! I'm not crazy about the visible tape (I don't do glue guns), but ah well. I'll be getting these in May when we visit the US.

Size discrimination with wooden eggs. I bought these wooden eggs from this Etsy store a while back. They were so pretty in their natural state, but I was tempted by this post on The Wonder Years, so I dyed them. I am SO happy with how they turned out! They came in 4 sizes - perfect for a sorting activity.

Click here to see our Easter sensory tub and playdough.

Math:Counting eggs. A little felt, a needle and thread and a bit of fabric paint and presto - you have counting eggs. James caught me making these yesterday and was SO excited about them! Wait 'til he sees the numbers on them - he'll love it.


Counting bunnies. I made something similar for St. Patrick's Day and James really enjoyed it, so here's an Easter variation. :)

Chick counting game. This is another brilliant idea from My Montessori Journey. I took an ordinary die and covered it with blank address labels, then I wrote a 1 or a 2 on each side. James will roll the die, and if it lands on, say, 2, then he'll put 2 chicks in the egg tray. He'll continue on this way until the tray is full. Fun!

Letters:Alphabet eggs. I love these! I got the idea from - where else - My Montessori Journey. I printed off the template from Kidsoup onto some of my scrapbooking paper, cut them out and laminated each egg. A bit tedious to make, but so worth it - they're so nice to look at! There's an egg for each letter and the idea is that James will put them in alphabetical order. And bonus - we can practice spelling his name, too!

B is for Bunny. I used this template and some flat marbles for this activity. Easy peasy.

Misc.:
Lock and key. This is a classic Montessori activity. I found the lock and key set at the dollar store, and the small chest at the thrift store (gotta love thrifty finds!). The set has a large, medium and small padlock with a key for each in the corresponding size. I color coded the keys with a piece of a pipe cleaner to make it a bit easier for James.

A couple of sorting activities...
Sorting egg shaped beads. These glass beads are so pretty, I think James will enjoy playing with them.

Sorting egg shapes. These were once a part of a garland that I found at the dollar store. It's hard to tell from the pic, but they're really sparkly. :D

I have lots of Easter art ideas, but I'm holding off on doing them until next week. Our 13 year old niece, Tia, arrives tomorrow and will be staying with us for a couple of weeks. We are all so excited for her visit. I think it'll be great for James to spend time with his cousin, particularly since we don't see family but once or twice a year. Anyway, I've learned she's really into crafts (yay!!), so I'm hoping she'll want to join us in some artsy activities.

Monday, March 22, 2010

Homemade Gift Bags

With James' birthday just around the corner and in an effort to go a little more green, save money, and feed my creating needs, I whipped up a bunch of homemade drawstring gift bags using this tutorial.
love the pattern on this fabric!

Not only are these cheaper to make than the cost of the paper gift bags you can buy at the store, they are also prettier, very eco-friendly and, of course, made with lots of love. Oh and they'll last forever, too!

Greens and blues - my favorite colors.

Hard to see in the photo, but these are pinstriped. The tall one is holding a bottle of wine.

A large bag with a sweet farm pattern to hold James' wooden farm animals.

I feel fortunate to have found such nice fabric down here. With only one fabric store on the island, it's slim pickin's to say the least. Some of it I bought half off during an after Christmas sale. The yarn was a bit of a splurge though - I bought organic cotton (sooo soft) and some wool because it's so much nicer to work with (I fingerknitted the yarn into drawstrings).

I made a few of these little bags for James' Easter basket.

So... what do you think? You should make some too! Honestly, they take such little time to put together and you only need to have very basic sewing skills. I hand stitched all of these, though a sewing machine would make the process even faster (if that's your goal).

Friday, March 19, 2010

Welcome, Spring!

Spring has definitely sprung here in Bermuda. All day long I hear the birds chirping happily as they gather goodies for their nests. For some reason, birds really like our house. There are no less than 13 nests around the perimeter of our roof! I figured since we see these nests every day, we may as well do what we can to make them look pretty and help out the birds, too. So, James and I made a wool tree using some bits from my wool stash.
{This lovely idea came from my favorite blog, The Magic Onions}

James and I had such a good time hunting around the yard for sticks and talking about what we were doing and why. He kept saying, "Come on yittle babies, get warm!" He also did a great job arranging the sticks in the glass pitcher (filled with river stones for stability).

He (and Grover) worked carefully to put wool roving on the tips.

After we made the tree, we went inside and cuddled together on the recliner watching our tree to see if anybirdie was interested. We had no takers at first, but after dinner I noticed an empty branch. ;)

Oh and a lovely flower maiden is visiting our nature display. I needle-felted her the other day along with the little eggs you see in the nest.

{A beautiful hibiscus fresh with raindrops, sitting just outside our door}

Happy Spring, everyone!


Wednesday, March 17, 2010

Color Matching Activity

I created this activity for James ages ago when he was first learning colors. I ran across it recently and just for kicks I put it out on our shelves. James LOVED it! Of course it was easy for him, but what a fun sensory experience nonetheless! I decided to post it because I thought those of you with younger children might find it useful.

You can easily recreate this activity with things you have in your home right now! I found the color cards at our local teacher's supply store, but any color flashcards could work and of course you could make your own. Mosey around your house in search of small, solid color objects for each color. Note: I limited it to 3 objects per color because when James was much younger I didn't want to overwhelm him with so many options. (Oops - I now see the 3rd brown object is missing!) :)

Monday, March 15, 2010

Can I Take Your Order?

Welcome to Mari-Ann's Felt Food Cafe!

Would you like a sandwich with ham, swiss and cheddar cheeses, tomatoes, lettuce and pickles?
The bread is freshly made!

OR...

Would you like a simple, yet tasty peanut butter and jelly sandwich?

In the mood for Italian?How about a delicious pizza with sauce, mozzarella and cheddar cheeses, pepperoni, green peppers, and mushrooms?

OR...

Perhaps you'd like some fresh bowtie pasta with butter.

Feeling spicy? We have a zesty taco filled with meat, lettuce, tomato and cheddar cheese. Oh, you noticed the taco shell looks a lot like the pizza crust? Yes, well, we're all about reduce, reuse and recycle around here!

For dessert there are some yummy chocolate chip cookies!

Or if you're interested in something lighter...
We have some lovely eggs with oranges and strawberries on the side.

Bon Appetit!

I went on a felt food craze last month and whipped up a bunch of goodies in preparation for James' birthday. Can't believe my baby is going to be 3 in less than a month!! Check our Polly's blog for more felt food creations.


LinkWithin

Related Posts with Thumbnails