Monday, November 29, 2010

Our Continent Bags - Asia

Here's our Asia continent bag. As with each of our continent bags, I do my best to find a variety of things to represent the continent as a whole. This was tricky with our Asia bag, though, because we have family and friends from China and Japan and so most of our souvenirs are from those countries.

Here's what's inside:

Books. Some of the books are from China, gifts to us from my brother-in-law's girlfriend. She was so excited to find out about James being able to count to 10 in Mandarin (here's the language program we use) and so she sent us these books. I think she hopes James will continue to learn Chinese and that he'll someday learn to read these books. The blue book is kind of unintentionally humorous - it's a dictionary of American idioms... talk about getting lost in translation. :)

Japanese souvenirs: a Mangekyou (kaleidoscope), a Daruma doll, and a San Kai Koma (3 layered spinning top). These items were gifts from our friend, Kana, who recently visited her family in Japan.

Miscellaneous souvenirs: Tibetan prayer flags, a mask from Papua New Guinea*, chopsticks from Bali, and a Japanese hand fan - all of these were purchased at a local fair trade store. The silk scarf is from China and was a gift to me from my brother-in-law's girlfriend. *I can't seem to find a definite answer as to which continent Papua New Guinea belongs to. I've read mixed opinions all over the web and the majority seem to align it with Asia. Feel free to add your two cents. :)

Music and artwork. I purchased the drum CD years ago at the World Showcase area in Disney's Epcot Center and you can buy the Putumayo CD here. I wrote more about the artwork here. I chose artwork to represent India, Japan, China and Thailand.

Pictures and postcards. The pictures are from the continent kit from Montessori For Everyone. The postcards are from Singapore and Japan.

Papers, cards, and stamps. The papers can be used for Origami - this site has some easy models for kids. The rubber stamps are from my scrapbooking stash.

Chinese flashcards. I found these beautiful cards here and I cut and laminated them. I think James will enjoy looking at these and, someday, I hope he'll be interested in trying to write the characters on our Buddha Board.


Animals. I've had those two stone carved animals since I was a child!

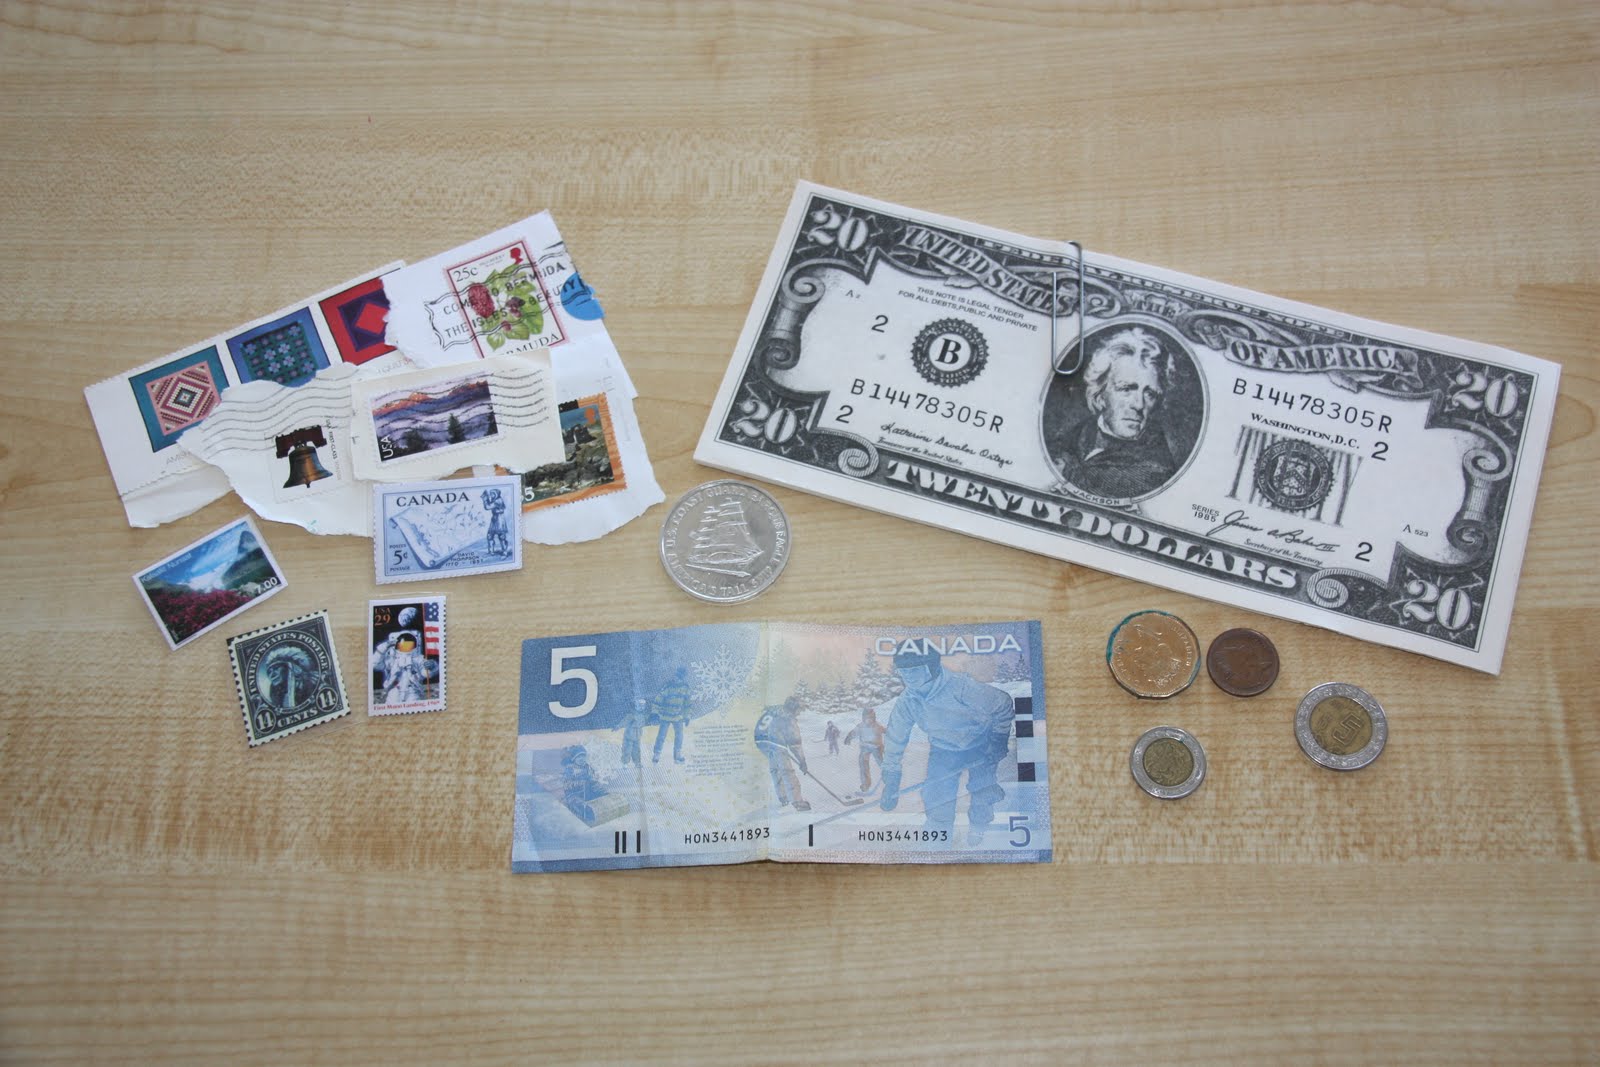
Money, flags, and stamps. The stamps and most of the currency is fake and are simply images I found on Google. Here again I tried to represent a variety of countries. The Iraqi Dinar is real and was given to us by a friend of ours who was in Iraq during the war. The tiny coin is a real Hong Kong penny, but the other coins are fake - I think I found them in a craft store years ago. The flags (China & Japan) were purchased here.

This is a great cookbook with simple, yet authentic recipes from around the world. For each recipe there's a bit of history, too. I'd love to know if you have an authentic and kid-friendly recipe that represents Asia. If you'd like to share it please email me at countingcoconuts(at)gmail(dot)com. Thanks!

And speaking of food, one thing I think would be really fun to add to a continent bag is some felt food - in the case of Asia, something like sushi would be cute!

I hope you've enjoyed this photo tour of our Asia Continent Bag! You might also enjoy these other posts from my Continent Bag Series:
Our Continent Bags
Our Continent Bags - Storage
Our Continent Bags - North America
Our Continent Bags - Antarctica
Our Continent Bags - Europe
Our Continent Bags - Africa
Our Continent Bags - South America
Our Continent Bags - Australia

Also check out my Continent Bags photo album on the Counting Coconuts Facebook page.

I'm linking this post up to The Preschool Corner and Montessori Monday.


~Thank you for your comments!~

Wednesday, November 24, 2010

Our Continent Bags - North America

As promised, I'll be sharing all seven of our Continent Bags over the next several weeks. In Montessori, when you begin introducing continents to a child you always start with the continent you live in. So, first up, is North America...

I should point that not all of these things will be available in the bag at the same time - I'll rotate things in and out so as to keep the bag new and interesting.

Here's what's inside:
Books, maps, and cards. A North America True Book (I have one of these for each continent - they're great!), some landmark cards, a North America fact sheet, and two maps - one is pre-colored and laminated and the other is blank and ready for James to color. One annoying thing about maps of North America is that they often omit Bermuda. A good Atlas will show it, but in general I find I have to add a little dot to the map and mark it.

Various stickers and a Bermuda flag patch. I have a huge sticker collection from my scrapbooking days. You can find state and country stickers like these in the scrapbook section of any major craft store or you can buy online here.

Miscellaneous souvenirs. I collected these things during my travels over the years. Most are from the United States, but some of the small pins are from Canada and Bermuda, the little shoes are from the Dominican Republic, the woven mat is from Belize, the necklace is from Mexico and the small tiki pendant is from Honduras.

Music and artwork. I'm really excited about the artwork as I put a lot of time and effort in hunting down just the right portraits. I created a collection for each continent and my criteria was that the artwork needed to represent the region by showing either people, animals or landscape. I also preferred for the artwork to have been created by an artist native to that region. As for the music, the first CD, Matriarch, is performed by a Native American and it's just lovely. There's also some Bob Marley to represent the Caribbean (Jamaica specifically).
I ordered this Putumayo Kids CD, which my niece is bringing with her when she visits later this week. I love Putumayo's music collections and I'm looking forward to hearing this one - it received great reviews.

The red dirt in the baggie is from The Grand Canyon (Arizona, USA), the rocks are from The Rocky Mountains (Colorado, USA) and the dreamcatcher is a representation of Native Americans.

Rubber stamps, maps, brochures, and lots of postcards. This is very small taste of my North American postcard collection. Some of these are from the postcard swap we participated in earlier this year, some are from my travels, and quite a few are from my childhood collection. I started collecting postcards when I was 8 years old. Whenever a friend or family member traveled anywhere they'd always send or bring me back a postcard or two. I unintentionally (but thankfully!) brought my entire collection with me to Bermuda. It's a real treat to now share these cards with James.

Spoons. Another collection of mine. I pick one up from wherever I travel to. Yes, I know collecting spoons is a little "old lady-ish" :), but what can I say? Again, this is just a small selection from a much larger set. I pulled out a variety that I felt represented North America as a whole. I have quite a few from the US, which we'll use when the comes time for us to focus on just America.

Three part cards and pictures. You can read more about my pouches here. After much deliberation, I bit the bullet and purchased the entire continent kit from Montessori For Everyone. I am SO glad I did - not only is the kit absolutely wonderful, it saved me loads of time in hunting for the photos and information on my own, not to mention the time it would have taken for me to design and format everything. It did, however, take me a long time to print and cut everything (thanks, hubby, for helping me!), but now that it's all said and done I can say the kit was, without a doubt, well worth the time and money. The quality can't be beat - I highly recommend it.

Animals. I just love that big moose. :) Safari Ltd. makes some really awesome Toob collections that are great for continent boxes.

Money and stamps. One thing I didn't bring to Bermuda with me was my foreign currency collection (yes, another collection!). I am SO bummed about not having this because it would be perfect for our continent bags. For some reason, though, I did find some Canadian money in our house! I'll be adding some Bermudian and US money to the bag at some point. I also plan on printing out some fake currency from other North American countries. I'm not sure where those extra large US bills came from - I've had them for ages. Some of the stamps are real, others are images I found on Google.

Some day, we'll be focusing on just the United States and when we do I'll have plenty for that bag. (I plan on making a bag for Bermuda, too.) The Which Way USA book and map are a part of a monthly subscription I receive - these are GREAT. The tags are from my scrapbooking days.

I can't wait to see this Kids Around the World cookbook in person - my niece is bringing this down for us, too. I thought it would be such fun to have the opportunity to "taste" a continent. James loves to help me cook and I think he'll really get a kick out of this. In addition to this book, I have some authentic recipes - dishes that are specific to the region - for the US and Bermuda. If any of you have an authentic and kid-friendly recipe (meaning it's not too complicated to prepare) that you'd like to share, please email me at countingcoconuts1(at)gmail(dot)com. Thanks!

Flags. I couldn't afford to purchase flags for every country, so I tried to choose a flag that represented each of the major areas within North America. I chose Bermuda (of course!) for the Caribbean (even though we're not technically located in the Caribbean) and Cuba for Central America. I just realized I should have gotten one for Mexico... oops! The MFE continent kit came with 3-part card sets of flags for each continent, but I'm too lazy to print them waiting to print them until James is a bit older. ;)

I hope you've enjoyed this photo tour of our North America Continent Bag! You might also enjoy these other posts from my Continent Bag Series:
Our Continent Bags
Our Continent Bags - Storage
Our Continent Bags - Asia
Our Continent Bags - Antarctica
Our Continent Bags - Europe
Our Continent Bags - Africa
Our Continent Bags - South America
Our Continent Bags - Australia

Also check out my Continent Bags photo album on the Counting Coconuts Facebook page.

Here are a few links to some awesome blogs where you'll find even more continent box ideas and photos:
Sunrise Learning Lab
Montessori Tidbits
Child and Me
LaPaz Home Learning
If you've blogged about your continent box, feel free to add your link the comments section.

I'm linking this post up to The Preschool Corner and Montessori Monday.


~Thank you for your comments!~


Tuesday, November 23, 2010

Shocked, honored, and humbled...

That's how I feel right now. Well, all that in addition to excited and just plain giddy! I am still in shock that Counting Coconuts won "Best Crafts, Plans & Projects Blog" in the Homeschool Blog Awards! I am beyond honored to be given such an award and I'm incredibly humbled to have been chosen when there were so many others in my category that are much more deserving of this award.

At the risk of sounding proud, I want to say a few thank yous because without everyone mentioned below, I wouldn't be receiving this awards in the first place!
First and foremost I thank God for planting in my head the idea of starting this blog just a little over a year ago and for helping me with it along the way. I have to admit, I have had times when I wasn't sure I wanted to continue blogging and it's through prayer and His guidance that I am still here sharing with you.

A HUGE thank you to my sweet, patient, and incredibly supportive husband, Paul. Never once have you given me grief about the amount of time blogging takes. Quite the opposite, in fact! You give me space to write, encouragement about ideas, and you're always generous with your faith and confidence in my abilities. Thank you, Love.

Of course I need to thank my little muse, James, for blessing me with his existence. If it weren't for his enthusiasm and his insatiable desire to learn, I wouldn't be creating any of these activities in the first place! Thanks, Peanut, for inspiring mama.

Thank you to The Homeschool Post for hosting this event - I can't imagine the time and effort it took to organize it all. Not everyone in our lives realizes just how big blogging is and just how hard us bloggers work at posting our thoughts and ideas. I think it's extremely important that we give our thanks and support to one another since we're all in this together. Blog awards are a wonderful way of doing that.

I also want to say a special thank you to my dear friend, Susan, who I met through blogging. Thank you for being there for me through my ups and downs, for helping me see the obvious when it's not so obvious to me and for being the wonderfully kind person you are. You're proof that true friendship can most definitely exist in the cyberworld.

And last, but definitely not least, thank you, thank you, thank you to all of you for voting for me and for your constant support - your kind and encouraging comments and emails mean so very much to me. You don't know how moved I am by the stories you share with me and how often I shake my head in disbelief that you find my ideas useful enough to implement in your homes and schools. Truly, I can't thank you enough.

Sheesh - I sound like I've won the Oscars or something, don't I?! I guess I'm just feeling really grateful. :)

Please join me in congratulating all of the winners. The Homeschool Post has shared links to the nominees and winners here.

Saturday, November 20, 2010

Bath Time Sensory Tub

Since our harvest sensory tub ended up being used only outdoors (note: straw is MESSY!), I decided to put together a second tub for James to use indoors.

This fun tub is all about bath time and it was a HUGE hit with James!

Here's what's inside:
:: Cotton balls (aka bubbles)
:: Blue pom-poms
:: Scented bar of soap (this smells sooo good!)
:: Clear plastic crystals
:: Large, blue glass stones
:: Glass baby food jar (for collecting and pouring)
:: A little rubber duckie :)
:: Alphabet beads
:: Fish-shaped bath mat (the suction cups hold the beads perfectly)
:: Tweezers (to transfer the beads to the mat)


~Thank you for your comments!~

Thursday, November 18, 2010

Our Continent Bags - Storage

Earlier this week I wrote about our continent bags and now I want share with you how I store the items inside of the bags.

For each bag there are a few 3-part card collections as well as various sets of photos, postcards, maps, etc. I knew I needed a way to keep everything organized and separate so I created some envelopes for each set.

First, the 3-part card envelopes. Admittedly, these are not the most perfect envelopes, but they get the job done. Whenever possible I try to avoid using plastic in our classroom mainly because I don't think it's aesthetically pleasing, but, since I needed quite a few of these and since I can't afford nor do I have the ability to make something like this, I had little choice. My dear friend, Susan, shared this link with me and I was inspired to create my own variation. UPDATE: Also visit Montessori Print Shop's excellent photo tutorial!

As you can see, I added a flap to one end and a little square of velcro to keep the envelope closed while its not in use. I used scrapbooking paper and kept in mind the coordinating continent colors. I added a label to the front of the envelope, too.

These were really easy to make and if you'd like to create your own, here's a quick tutorial:
1. Simply cut the paper based on the size of your 3-part cards.
2. Fold up the bottom (this will end up being the pockets).
3. Crease the paper lengthwise to create three sections.
4. If you'd like, create and adhere a label to the front cover of the envelope. I made a few of these without a label so I could use them for general use in the classroom.
5. With just the bottom folded, put the paper through a laminator.
6. Cut away the excess plastic and refold the paper using the creases as a guide.
7. Using an Exacto knife, very carefully cut slits in the plastic just above the fold. Doing this will create the pockets.
8. Add a square of velcro to the front cover and to the word card section.

You'll notice the plastic does buckle/bubble a bit when folded. Like I said, these aren't perfect, but if you can look past that flaw you'll find they are a quick and cheap alternative.

I also made some very simple pockets using the same kind of fold, laminate and cut method. I really like how these turned out and I'm so glad to finally be putting some of my scrapbooking paper to use!

For the various loose object, such as animal figurines and souvenirs, I hand stitched some small drawstring pouches.

Lastly, I used basic pocket folders (the kind you can find at any office supply store) to store large paper items such as maps and information sheets. Again, I color coordinated these with the traditional continent colors.

I hope you found this helpful! You might also enjoy these other posts from my Continent Bag Series:
Our Continent Bags
Our Continent Bags - North America
Our Continent Bags - Asia
Our Continent Bags - Antarctica
Our Continent Bags - Europe
Our Continent Bags - Africa
Our Continent Bags - South America
Our Continent Bags - Australia

~Thank you for your comments!~

Tuesday, November 16, 2010

Homeschool Blog Awards

I am so incredibly honored to have been nominated in the 6th Annual Homeschool Blog Awards! A huge thank you to those who made this possible!!
There are so many amazing blogs being nominated and I know it's a real long shot that I'd win. That said, I do feel kind of silly about putting this out there, but if you enjoy my blog and have a free moment, I'd truly appreciate your vote!

You can find my blog in these categories:
1. Best Crafts, Plans & Projects Blog
2. Best Homeschool Methods Blog
3. Best Variety Blog
4. Best Super Homeschooler Blog

And even if you don't want to vote for me, please do cast a vote for someone - these awards are a wonderful way for all of us to support one another! Hurry - voting ends this week!!


~Thank you!~

Monday, November 15, 2010

Our Continent Bags

Yep, that's right - continent bags! Traditionally, boxes are used, but I opted for bags instead...
I did this for a few reasons: 1) it's easier to store bags than rigid boxes, 2) I really wanted to honor the traditional colors Montessori uses for each continent (see below) and I knew I'd be able to do this with fabric (no chance I'd find colorful and uniform boxes down here), and 3) I knew I'd need more room for the contents than a box can offer.

~UPDATED TO ADD: Several of you have asked a bit more about the bags. They have a drawstring closure and are 12"w x 13"l in size. I didn't use any kind of pattern, I just sort of eyeballed it. I wanted them to be large enough to hold a standard size folder, but I do wish I had made them just a bit bigger. They looked plenty big until I put everything inside of them! And yes, they are hand-stitched (I still don't own a sewing machine). :) I thought about putting an applique of the coordinating continent on the outside of the bags, but I decided against it because I could just imagine the image folding along the natural creases of the bag, thus making it hard to discern its shape. Also, James has memorized the colors for each continent thanks to our extensive use of the continent puzzle map, so it's really not a necessity in our case.

Now I know some of you are wondering, what exactly is a continent box?
A continent box is simply a container filled with information and various items that represent a specific region of the world. There's one box for each of the seven continents: North America, South America, Europe, Asia, Africa, Australia (aka Oceania or Australasia) & Antarctica. Continent boxes are a part of the Montessori geography curriculum and they are a very fun and tactile way for children to learn more about the world. Depending on what's included in the boxes, a multi-sensory experience can be had.

I'm so excited because after months and months of planning, printing, laminating, sewing and collecting, I'm about 98% finished preparing our continent bags. I'm eager to share more about this project with you and I'll do so over the course of several posts. I really want to give you all the details (read: TONS of photos, tips and links for each bag) and there's no way I'd fit it all in one post, so stay tuned!

Oh, and for those of you who'd like to know, here are the traditional Montessori continent colors:
North America - Orange
South America - Pink
Europe - Red
Asia - Yellow
Africa - Green
Australia - Brown
Antarctica - White

You might also these other posts from my Continent Bag Series:
Our Continent Bags - Storage
Our Continent Bags - North America
Our Continent Bags - Asia
Our Continent Bags - Antarctica
Our Continent Bags - Europe
Our Continent Bags - Africa
Our Continent Bags - South America
Our Continent Bags - Australia

~Thank you for your comments!~

Sunday, November 14, 2010

Easy DIY Counting Cards

I just want to share this quick and easy idea with you - homemade counting cards. In Montessori, counters and cards are used for quantifying. We've used them often in the past, but I've always used pre-made numbers made of wood or foam and/or printables that I've laminated. It occurred to me that I could make good use of the MANY stickers and papers I have from my scrapbooking days.
I simply used thick cardstock, cut it down to a reasonable size and centered the stickers. I also distressed the edges of the paper for a fun look (well, actually, the blade on my paper cutter is terribly dull and so I was forced into the distressed look :). I might laminate them too for extra durability. The great thing about making your own cards is that you can make them to suit your taste and/or needs - I'm thinking some cards with red stickers matted on a green patterned background would be lovely for Christmas.

Here are the cards being used with little bowtie pasta as counters.

Visit your scrapbooking or craft store and make some of your own!


~Thank you for your comments!~

Saturday, November 13, 2010

The Felted Pear Giveaway Winner

Congratulations to Valerie, of Kite Koop - you've won the $30 gift certificate to The Felted Pear!

THANK YOU to all who entered the giveaway!

Thursday, November 11, 2010

On Our Shelves - November

Here are our activities for November - some are fall/Thanksgiving theme related, some aren't. These activities are for the entire month of November. I should note that I don't put them all out at once, but rather I rotate them around.

Practical Life
Button Turkey. This is the same one I made last year, the idea came from here.

Pouring Corn Kernels. Always arrange transferring work so it begins left and moves right (it simulates the direction of reading). I've made an exception to that with pouring and I arrange it with James' dominant hand in mind.

Snap Dressing Frame. I got this from Kid Advance and I can't say I'd recommend their dressing frames. They're a bit tight and hard to work with. I had to cut and alter them in order to make them usable.

Sorting Beans

Tonging Pom-poms

Transferring Marbles. The little suction cups hold the marbles perfectly, but it does require some careful handling. Excellent fine motor activity.

Transferring Fruit. These fruits are actually little erasers, which I found locally. James will use a strawberry huller to transfer these from one bowl to the other.

Lacing Wooden Spools

Sensorial


Color Tablets... with a twist. These were starting to collect dust, so I put some flashcards out along with the box. It worked! James worked with these a few different times last week.

Language

In our book corner:
In November by Cynthia Rylant
Scarecrow by Cynthia Rylant
Too Many Pumpkins by Linda White
This First Thanksgiving Day: A Counting Story by Laura Krauss Melmed
A Plump and Perky Turkey by Teresa Bateman
Thanks for Thanksgiving by Julie Markes

Poem & Poetry Basket. This fun idea comes from My Montessori Journey and the poem, which I found in one of my poetry books, was written by John Updike.

Thanksgiving Vocabulary Cards. I found these on abcteach.

Reading Cards. Now that James is sounding out words, he's anxious to practice his new skill. These cards are great because on one side there's the word and corresponding photo, and on the opposite side there is just the word. James and I went through these once using the photo side and then again using just the word side - he read them all quite easily.

James is definitely in a sensitive period for language. He's reading a lot and this week he's taken to spelling out tons of random words. It's pretty cute because he'll be talking and he'll say, "Mom..." and then he'll pause to spell out the word m-o-m and he'll continue on with his sentence stopping to spell this or that word as he goes along. :)

Math

Cards & Counters. I used some cornucopia calendar inserts for the cards and leaf sequins as the counters.

Pumpkin Pie Game. This is just like the one we did last year, only this time I used larger numbers and small plastic pumpkins (which I found at Hobby Lobby while I was in the states - I highly recommend them). This work was a huge hit with James and we ended up doing much more with it than I originally planned. We worked on the concepts of less/more, bigger/smaller, some/all/none and also addition/subtraction.

I also printed out a couple dot-to-dot activities from abcteach.

Culture/Science
Leaf Rubbing

Anatomy of a Bird Puzzle

USA Puzzle

Discovery Tray. Lots of fun things on this month's tray: a seed pod, some acorns, a geode (which we'll crack open next week) and those sweet little husk dolls were a precious gift from Beth of From the Hive. Thank you again, Beth!

Plant or Animal Cards. These are from Montessori For Everyone. These were super easy for James and he kind of looked at me like, "why are we doing this?" Ha! But while he knew for sure what was or was not an animal, he seemed a bit surprised by what was a plant. Like the grapes or flowers or trees - we've never really referred to them as a plant before.

Art & Music
Stamping. I had this out for October and James LOVED it.

Build A Scarecrow. For this activity I simply cut out little bits of clothing which James can put together to make a scarecrow.

Cutting Stickers. I spaced out these little fall stickers along a strip of paper so James can cut in between them.

We're singing some of these songs this month.

Instrument Nomenclature Cards. I made these myself. I'm sorry, I tried and tried, but I wasn't able to format these properly in order to share them as a PDF. You can find the images on Google, save them to your hard drive, then collectively print them.

Nearer to Thanksgiving we'll be doing a "thankful turkey" activity. James will think about and tell me what he's thankful for and we'll then write it down on little feather shaped pieces of paper and add them to a cut-out of a turkey. I've remember doing this when I was in grade school and I'm excited to do it with James now.

I also printed out some color pages from abcteach.


~Thank you for your comments!~

LinkWithin

Related Posts with Thumbnails